
I shared my first reupholstering project a few days ago, and many of you were impressed with my having tackled such a big project(a loveseat) as my first dip into the furniture renovation pool. I credit blind ignorance with getting me through that one. I had bought the fabric, and 10 years ago 8 yards of upholstery weight fabric was a huge investment for us. There was no way that I was going to give up on the project, no matter how difficult, with that chunk of change on the line. Blind ignorance is not really a recommended method, so I thought I'd share my latest project for anyone still looking to tackle their first reupholstered piece of furniture. I was helping a friend empty out her attic to make room for some things that she used to store in her basement. When she tried to toss this old, lumpy chair, I had to put it in my van.

See the weird lumpy seat? It looked like the scene from Alien right before the alien baby pops out. Along with the strange seat situation, there were a host of other issues with this chair.

No worries, it was still coming home with me. The first thing you have to do when reupholstering is to deconstruct what's already there. I knew this wouldn't be a super simple redo like these dining room chairs I did last year. The construction of this chair was more complicated than just pulling off a seat and stapling on some new fabric. I started by pulling off the back fabric. It was held on by pretty hammered upholstery tacks. I tried to save as many as I could to be reused.

When I pulled off the front of the chair back fabric, I was surprised to find wadded up paper towel.

Apparently, the chair had been recovered before, but instead of using new padding, they just filled in the button tufting with paper toweling. Weird, huh?

Underneath that layer of fabric(look at the vibrant colors on the backside) was still more fabric.

And beneath that was some straw and maybe horsehair.
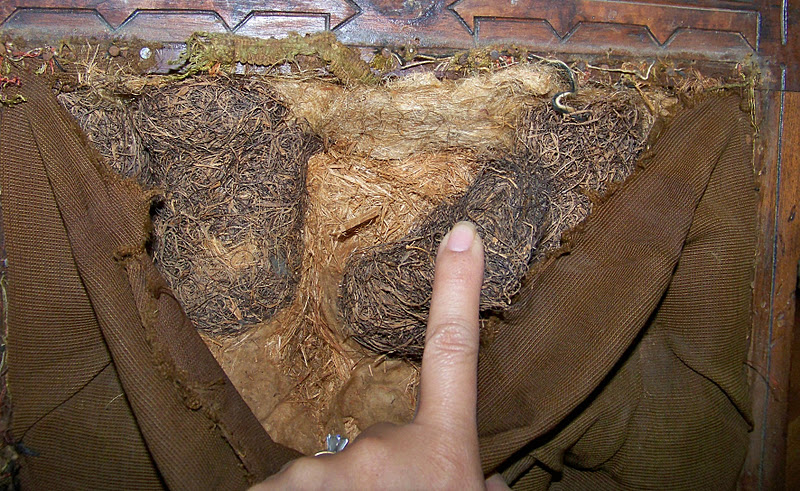
Pulling all that away left me with some webbing.

The webbing was pretty much disintegrating, so that had to go, too.

Are you ready to find out what was causing the crazy one-sided lump in the chairseat? Under the fabric was some 1"foam. The previous redo must have pulled off the original fabric for a template.

Under that foam was still more foam. This project was starting to feel like our kitchen reno, where every layer of floor we pulled off revealed another layer of floor.

Under that foam was some cotton batting and an ominous shape.

Under the batting I found some springs. 8 way hand tied springs are really the gold standard in upholstery,

but the cording had become so old and brittle that it snapped in several places which led to the springs being pulled out of place and sliding sideways.

I removed the springs which led to more webbing,

and under the webbing there was...paneling? Even weirder. The best I can guess is that when the previous person had redone this chair, the cords on the springs had already started to fail leading to a soft spot on the one side and they nailed on the paneling to shore up the bottom.

After pulling off all of the fabric, foam, batting, straw, webbing, and paneling, I was left with a million nails and upholstery tacks.

About 47 hours with a set of pliers,

the chair started to get a little loose.

But that's a story for reconstruction. I'll stop here because this post is already super long. Tune in soon for Part 2 Reconstruction.
Thanks for popping in and DIYing with me.
Thanks for popping in and DIYing with me.


I love your can-do approach to upholstery. I first tried it in high school for a school play, and I never looked back! Great job! ~CJ
ReplyDeleteCan't wait to see the finished project. I do some simple upholstery but don't know if I'm brave enough to tackle a project like this.
ReplyDeleteI'm a new follower , I have got to see how this turns out !
Amazing job! What an idea! Thanks for sharing.
ReplyDeleteHope to see you on my blog:)
Looking forward to part 2! I can't wait to see the finished project.
ReplyDeleteThat was some journey through the layers of that chair. I'm not sure I would have kept going! Now that we've seen it come apart, I can't wait to see it come back together!
ReplyDeleteI need to do this to my couch. Thank you for sharing.
ReplyDeleteYou are BRAVE!! Like an archaeological dig! Can't wait to see how it turns out. Visiting from BNOTP. :)
ReplyDeleteHappy Monday!
OMG I can't believe what all was inside that chair!! YIKES! I can't wait for Part 2!
ReplyDeleteI can't wait to see the finished product!! You always inspire me.
ReplyDeleteYou are so brave Marsha!
ReplyDeleteOMG! I have pulled things like this apart and after gasping at the mess I was making, I quickly called the upholstery guy!
I cannot wait to see Part Two.
You amaze me.
:)
xx
A