Sunday, January 30, 2011

Craigslist Nightstand Redo

Remember when I snagged this nightstand off Craigslist for Snuggle Bunny's room?
Well, I've been hard at work refurbishing it.  Wood purists may want to avert your eyes, because I decided to paint it.  I had planned on painting it all along, but after discovering it's pedigree, some of you(including my BFF) were pushing me to just give it a good rub down with some teak oil.  In fact, BFF said I should oil it, Ebay it, and roll the profits into a new nightstand.  I stuck with my original vision and pulled out the paints.

I started with a good sanding.
Then primed and spray painted it a semi gloss white that matches the trim in SB's room.  I used several light coats to keep the paint from running or dripping.
I taped off the handle which I wanted to keep white, so that I could paint the drawer the bright orange color I used in SB's room makeover.
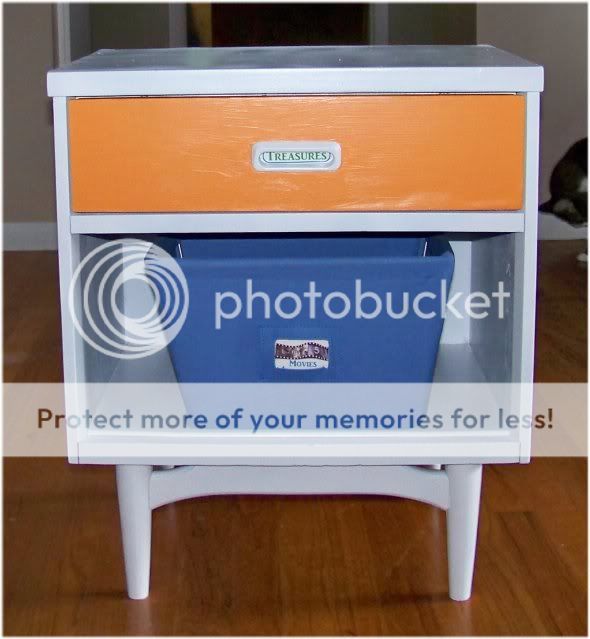
The handle had been a point of contention from the beginning.  Before I had seen the nightstand in person, I had planned on painting it and putting a new handle on it.  But after handing over the $5 for the nightstand, I realized that the integral recessed handle wouldn't be easily replaced.  Debbie over at Debbiedoo's Blogging and Blabbing had suggested that I could use the little recess in the handle to place a cute label.  I loved that idea!  So I printed off a "Treasures" label.  SB loves bringing home little found treasures like "special rocks" and such.

I lined the drawer with some Cat in the Hat wrapping paper that was perfectly coordinated to SB's room.

The shelf underneath the drawer seemed like the perfect place to put a basket or a bin.  This bin that I keep his nighttime movies in was a perfect fit.
And here's the finished nightstand.
And a shot from straight on, without the painting dropcloth.
SB loves his new nightstand and has already placed a few treasures in the drawer.

Thanks for popping in and painting with me.  I'm linking this up to Room Remix's Paint Party and Between Naps on the Porch's Metamorphosis Monday.  And make sure to head over to Debbiedoo's Newbie Party.


The DIY Show OffHOG
Domestically Speaking

Friday, January 28, 2011

Oatmeal Raisin Cookies

When I tell people what it is we don't eat on a gluten-free diet, I always explain it this way, "All the things that you might make a beer out of - Wheat, Barley, Rye, and Oats."  But the fact of the matter is that oats in and of themselves do not have the protein gluten, it's their proximity in the fields to all those other glutenous grains that makes them on the "no" list.  So those of us adhering to a gluten-free lifestyle need to search out gmo-certified gluten-free oats like these ones from Bob's Red Mill.
Today I made Oatmeal Raisin Cookies using some of these gluten-free oats.  Whirling Dervish happened to be passing by the kitchen as I was pulling these out of the oven, and immediately asked, "Are those oatmeal raisin?" with his hand hovering over the cookie tray.  He waited for me to respond that they were gf before grabbing a few.  He gave them the thumbs up.
I started by creaming together 1 stick of butter with 3/4 cup turbinado sugar and 1/2 cup agave nectar.

To this I added 2 eggs and 2 tsps vanilla.  I know it looks a little gross, but trust me it'll all come together.
In a separate bowl I whisked together 2/3 cup potato starch, 1/2 cup tapioca flour, 1/2 almond flour, 1/4 cup sorghum flour, 1 1/2 tsps xanthan gum, 1 1/2 tsps cinnamon, 1/2 tsp baking soda, 1/2 tsp nutmeg, and 1/2 tsp salt.
I beat the dry ingredients into the wet ingredients in the mixer bowl.
I then added 2 1/2 cups oats, 1 cup raisins, 1/2 cup chopped dates, and 1/2 cup chopped walnuts and mixed until combined.
I dropped rounded spoonfuls onto a parchment lined cookie sheet and baked them at 375 for 15 minutes.
They spread out a bit in the oven.

Thanks for popping in and baking with me.  Check out the other fun recipes at Tiny Skillet's Tailgating Time.


Thursday, January 27, 2011

Paper Love Birds

I posted my Valentine's mantel the other day and readers really liked the love birds that I made to decorate my winter branches.  I thought I'd share how I made them.
I started by picking out some fun pink scrapbook paper.  I folded the paper in half so that I'd get 2 identical bird cutouts so that both sides of the finished bird would be pretty.  I free handed my bird, because I'm a fly by the seat of my pants kind of crafter, but feel free to use a clipart pattern bird.  My general feeling is that as long as there's a beak and a tail, most people will get that it's a bird.
Once I cut out my birds, it was time to make their feet.  I took 2 medium sized paperclips and bent the middle section up.
I then straightened out the middle section.  This would be the bird's leg.
I took my paper bird cutouts and laid a glue dot at the base of one of the birds where I wanted the legs to come out from.
I added both legs and then another glue dot on top of the paperclips.  I set up the feet so that the bend of the paperclips were going in opposite directions.

After glueing the other side in, I glued on hearts for wings.  I cut these with a medium sized paper punch.
Thanks for popping in and crafting with me.  I'm linking this up to Sew Woodsy's What's up Wednesdays.

Wednesday, January 26, 2011

Valentine's Rag Wreath

I've made fabric rag wreaths before here and here, but I've never explained how to make them.  So when I made this pink one for Valentine's Day, I thought I'd take pics of the process.

This project starts with a wire hanger.  We don't use wire hangers, but the dry cleaner sends clothes back on them.  So instead of dropping them in the recycling bin, I reuse them in random projects.  Am I the only one who sees(and hears) Joan Crawford when I look at a wire hanger?  Come on fess up, I can't be the only one.

First you need to bend your hanger into a circle like shape.  It doesn't have to be perfect, because the shagginess of the fabric hides any odd bumps in your circle.  Then you need to pinch the hanger part and bend it down into the circle.  You'll hang the wreath from this.
Next assemble your fabric scraps.  I used four different pinkish fabrics for this project.  Don't ask me why I have so much pink in a house full of boys.  I may have a small fabric problem.  Let me know if there are any 12 step programs out there for this addiction.

I cut about a gazillion 3/4" x 6" strips of fabric.  You don't need to be exact, remember this is a rag wreath.  Perfection is not the goal.
I honestly don't know how many strips of fabric it takes to cover a wreath.  I cut out a bunch then start tying them onto the wire frame.  If I run out I cut some more.  I'd say that 50 of each fabric would be a safe number to start with.
Just keep scrunching them in tightly and tying on until you can't fit any more.  This is a super easy project that I banged out in one episode of the Nate show.  (For those of you unfamiliar that'd be an hour.)  I know that Nate took a bunch of flak early in the season for screwing up blogger day, but I like having the show on while working on projects.

Thanks for popping in and crafting with me.  I'm linking this up to Little Eme's Tute Your Own Tuesday, Elements Interiors' Whassup Wednesday, and Sew Woodsy's What's Up Wednesdays.

Gluten-Free Wontons

So it was kind of a tease to post wonton soup yesterday without first posting how I make my gluten-free wontons.  Oops, sorry.  My bad.
I start by whisking together 2 cups sweet rice flour, 1/2 cup mung bean flour, 1/2 cup potato starch, 1/2 cup arrowroot starch, 1 1/2 tsps xanthan gum, 1/2 tsp salt, and 1/4 tsp baking powder.  After all the dry ingredients have been whisked together, I create a well in the middle to which I add the wet ingredients.
Those wet ingredients would be 2 eggs and 1 cup of applesauce.  Mix this together and add just enough water to make this an elastic dough - about 3/8 cup.
Divide the dough in half and roll it on a well floured surface until it's quite thin.  If you have a pasta maker, you can get these very thin.
Cut into 3 inch squares.

Fill with your choice of meat, sealing the edges with an egg wash.  Drop them in boiling water to cook.  They're done when they float.   Alternatively you can fry them for a great party appetizer.

This dough also makes excellent raviolis when rolled a little thicker.

Thanks for popping in and cooking with me.  I'm linking this up to Gluten-Free Homemaker's Gluten-Free Wednesdays and Dr. Laura's Tasty Tuesday.

*Editorial Note* I've had several people ask about the mung bean flour that I used in this recipe.  I buy it at the asian grocery store.  If you don't frequent an asian grocery, you can substitute millet flour or some more sweet rice flour and the recipe should turn out just fine.

Tuesday, January 25, 2011

Wonton Soup

It's been bone chillingly cold up hear in the Northeast.  That take-your-breath-away cold can only be negated with the warmth of soup.  Last night I made a wonton soup.
Wontons are traditionally filled with pork, but I used ground turkey.  It's fairly easy to get creative with a wonton filling, so I'm not going to give you exact measurements for what I used.  I added some black pepper, white pepper, onion powder, minced garlic, soy sauce, and seseme oil.  Gluten eaters can use store bought wonton wrappers.  I of course made my own.
I put a rounded teaspoon of filling on each square and sealed the edges with some egg wash.  When I was a little girl, my mom would give me the job of painting the egg wash onto the edges of the wontons.
I folded the square over the filling into a triangle and pinched the edges shut.  These were what wontons looked like when made for the family for supper. 

My mom used to fold them slightly fancier when making them for a dinner party.  After folding the wonton into a triangle, she'd fold the edges in on the base. 

Then fold the tip of the triangle to the backside.
These wontons are cooked in the boiling soup base.  They're done when they float, but you can leave them in the soup without the dough getting overdone.

For the soup, I sauteed 3 minced garlic cloves, the sliced white portions of 2 scallions, and 1 tablespoon minced ginger in olive oil for a minute.  I added 8 cups chicken broth and a 3 inch piece of lemongrass and brought it to a boil.  I added 2 cups shredded cabbage, a handful of chopped cilantro, and the sliced greens of the scallions.  That's it easy peasy.  I like to add a bit of sriracha to my bowl of soup, but if heat's not your thing, you can leave it out.

Thanks for popping in and checking out what's for dinner.  I'm linking this up to Joyful Housewife's Mouthwatering Monday, Gluten Free Homemaker's Gluten-Free Wednesdays, and Lisa's Gluten Free's Health Food Carnival.