Showing posts with label crafts. Show all posts

Wednesday, June 13, 2012

Luau Craft - Sand Art Necklaces

As a room mom for my boys' classes, I've helped to throw a gazillion class parties.  We tend to stick with a basic formula of a story, a snack, a craft, and a game.  This year's first grade End of Year party is a beach / luau theme, and few things are more beachy than sand.  Remember the Sand Art displayed in the boys' Under the Sea bathroom?
Photobucket


We have several Sand Art bottles throughout the room, because it's a fun easy craft.  In that same vein, we decided to have sand art necklaces as the craft project for our luau party.  We found some fun fish bottle necklaces at Oriental Trading Company.
Photobucket


They each come with their own tiny little funnel, but an even easier way to fill them is with Pixy Stix.
Photobucket


You can fit the Pixy Stix into the neck of the bottle, and the finite amount in each stick makes over filling with any one color impossible.
Photobucket


It took 6 Pixy Stix(2 - 3packs) to fill the little fish bottle.  The kids are going to love making these to take home.
Photobucket


Thanks for popping in and crafting with me.

Monday, March 26, 2012

Yarn Ball Eggs

It always surprises me which posts continue to be looked at way after they've posted.  One of my more popular posts from last year was these Twine Ball Yarn Eggs.  So I figured I'd repost them for all my new readers.


 I wanted a twist on the classic twine ball and came up with these yarn eggs.  I started by grabbing some water balloons from the boredom drawer.  Water balloons are perfect for this project because they're small and egg shaped.

Blow up your balloons and tie them off.  Ever have a tough time tying a balloon?  Here's a tip: if you wrap the end around 2 of your fingers, you can pass the tail between them and pull it through.

Mix up white glue & water in a 1:1 ratio.

Cut off several yards of yarn(I used some fun Easter-y colors.)

Dunk the yarn in the glue, and squeezing out the excess, start wrapping your balloons.  You may want to tape the one end of the yarn to the balloon if you have very small helpers.  I didn't, but SB is a fairly experienced crafter.

Continue wrapping the balloon until you're happy with the amount of yarn you've used.

When all the balloons have been wrapped, lay them out to dry.  You can set them on top of plastic cups or just lay them on a glass or plastic surface.  I had an extra sheet of glass.  Make sure to turn them every now and again.  The glue will pool on the one side of the yarn egg.

When the yarn is completely dry, prick the balloons with a pin.

The balloons will deflate and you can remove them through the side of the egg.

I actually need to make more of them this year, because I could only find 2 of them in my packed away Easter stuff.

Thanks for popping in and crafting with us.


Keeping It SimpleVisit thecsiproject.comspring week

Monday, March 12, 2012

Spring Wreath

Spring has sprung at our house, and has made it's way onto our front door.

This wreath was so cheap and easy to put together with all my supplies coming from the dollar store.  I started by wiring some floral stems to a wreath form.

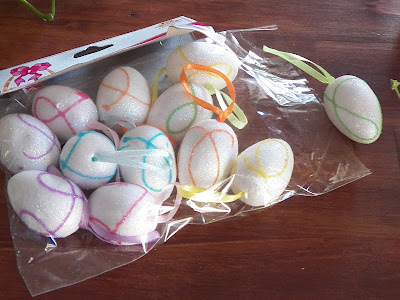
I picked up some hanging Easter egg decorations.  They came a dozen to a pack.

I pulled off the hanging ribbon, and hot glued them to my wreath.  That's it easy peasy Springtime wreath.

I had to wait to hang this, because my magnetic wreath hanger needed a couple quick coats of brown to disappear into my front door.

Here it is again on my front door with the newly camouflaged wreath hanger.

Thanks for popping in and crafting with me.


Polly Want a Crafter
http://www.thethriftyhome.comVisit thecsiproject.com

Sunday, March 11, 2012

Copycat - A Season Later

I take a lot of pics with my camera phone of things that I'd like to make or try.  Sometimes I tackle the project right away, and sometimes these pics just end up sitting in an inspiration file for some-time-later-maybe-next-year.  One pic that I snapped was from a Holiday Edition of Better Homes and Gardens way back in November.  I loved the snowy vignette and wanted to do something like that on my mantel.

Except, I didn't.  And now it's just about Springtime.  Still that pic was one that I loved, and really wanted to emulate, so here's my springtime version.  Instead of "snow" and evergreens, I filled my footed glass bowl with moss and tossed some ivy underneath the bowl.

The moss is reused from some previous mossy projects, and can be found at the dollar store.  The bird was pulled off of last year's Spring wreath.  This footed bowl will be finding a home on my Spring mantel, coming soon.

Thanks for popping in and crafting with me.
Debbiedoos

Tuesday, February 28, 2012

Book 'Em

I've been sharing our progress on our new bookshelves here and here.  We need the new bookshelves, because our book situation has definitely gotten out of hand.  I'll be weeding through our books as part of my efforts to get rid of 40 bags in 40 days, but I also used a few of our no longer needed books for a fun craft project, Book Vases.

It'll be fun to decorate the new bookshelves with these.  They started as old college texts.  It's been quite some time since CG and I were in college, and I doubt they'll be of any use to our boys, since texts change almost yearly(huge money racket, but that's a rant for another day.)

I pulled off the covers.  This is easier done with a paperback, but not too difficult with a hardcover either.  I sketched a fluid half vase shape, and cut it out.  This process would be super easy on a bandsaw, but for those of us without a full wood shop, scissors will do just fine.  Just cut a dozen sheets at a time, checking every now and again to make sure that your silhouette hasn't gone too far off course.

A little bit of hot glue

 and some finessing of the pages, and you have a fun art piece.

Thanks for popping and and crafting with me.
Home Stories A2ZTuesday To Do Party

Tuesday, February 7, 2012

Tissue Paper Flowers

For as long as my boys have been in school and sports, I've always been room mom, team mom, etc.  One of the duties of a room mom is to organize the class parties.  That usually means coming up with a theme, snacks (like the snowmen cookies for the winter party,) book to read, and age appropriate craft.  For this year's Valentine's party we'll be having a chocolate fondue with fruit & pretzels, and making bouquets for the kids to give their moms or someone else special.

Tissue Paper Flowers are easy to make and make great decorations that can be brought out every year.  You first start by cutting out tissue paper squares.

I stack 3 sheets and begin accordian folding.  Stacking more sheets will create a fuller mum-like flower.

Once the sheets have been completely folded,

I take a pipe cleaner and wrap it around the middle, securing it tightly.

Begin pulling apart the layers.

Your rose should look like this.

After accordian folding, you can use scissors

to cut the ends into a point or rounded curve

to create different looking petals.

Tissue paper flowers look great pulled together in a bud vase or en masse on a wreath form.

Thanks for popping in and crafting with me.
Sew Woodsy
http://www.thethriftyhome.com