
I showed you all the toile I purchased to redo CG's great aunt's Dining Room chairs yesterday. The chairs had such pretty needlepoint seat covers, but badly needed recovering.

Two of the chairs had already been recovered with fabric that matched her wing back chairs and even the seats that looked nice from the front were quite worn.

After getting aproval of my fabric choice and some great ideas regarding the needlepoint from my cyber friends, I went ahead and took apart the first chair.

It was pretty neat to find that the fabric had been attached with actual furniture tacks, not staples. Unfortunately, the tacks were much more difficult than staples to remove. I ended up just ripping the fabric off without removing all of the tacks after suffering some bloody knuckles.

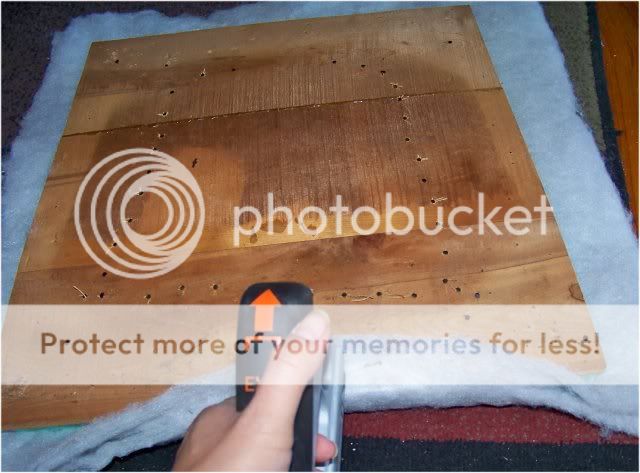
Instead of foam, the chairs had some kind of batting that came apart when I pulled the seat cover off.

So off to the fabric store to buy some 1" high density foam - with a 40%off coupon of course. I cut the foam to shape and chamfered the edges so the fabric would roll over smoothly. I didn't worry about how rough the chamfering was because it would be smoothed over with batting.

I cut batting about 2 1/2 inches larger than the seat in all directions. I had quilt batting on hand so I used a double thickness of it. If I had upholstery batting, I would have only used a single thickness.
I stapled close to the edge of the board in the middle of all 4 sides pulling tight enough to keep everything smooth, but not so tight as to cause puckering

and worked my way towards the corners making sure not to cover the screw hole for reattaching the seat to the chair.

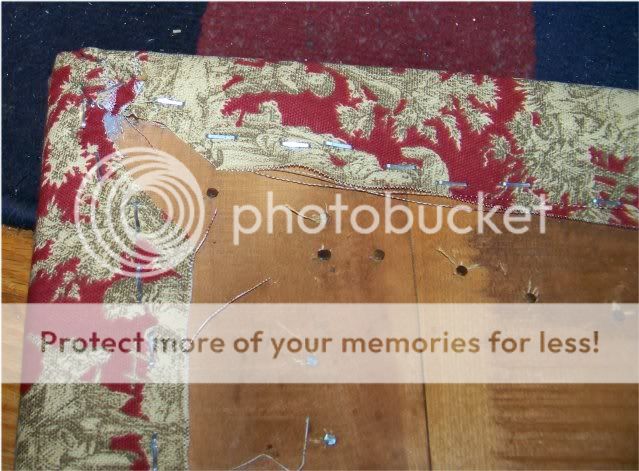
I laid out the fabric on my seat making sure to keep whole parts of the pattern on the middle part of the seat and cut the fabric 4 inches larger than the seat on all 4 sides.

I held the fabric in place and flipped the seat over to staple it on. Again I started in the middle of each side, pulling the fabric tight, but not too tight. I like to staple the fabric further from the edge of the board, because it seems to help with keeping the fabric smooth and unpuckered.

Again work your way to the corners making sure to leave the screw holes clear.
Flip it over and re-attach it to the chair.

Tada! 1 down, 5 to go.

I'm not trashing the gorgeous needlepoint. Look for it to be upcycled sometime in the future.
Thanks for popping in and check out the other great projects at Between Naps on the Porch's Metamorphosis Monday, Craft-O-Maniac's Monday Link Party, and My Romantic Home's Show and Tell Party.

Very cool, I need to do that to some of my old chairs I have sitting out in my garage so I can resell the table/chairs! You just put the thought in my head again!
ReplyDeleteNeat upholstery job! The new fabric brought the chair back to life. Well done!
ReplyDeleteAh so pretty! Who doesn't love toile? I hope you saved the needlepoint to make pillows! Terry
ReplyDeleteLove the fabric!
ReplyDeleteThanks for the compliments, everyone! The folks over at the gardenweb Home Decorating forum helped me out with tons of advice. I'm definitely saving the needlepoints. I'm salvaging what i can since there's lots of cat damage and framing them to put over the buffet.
ReplyDeleteGreat tutorial! I need to to the same on a few chairs! :)
ReplyDeleteThe chairs look wonderfully refreshed. The fabric goes really well with the finish. Glad you did not paint them white as I am getting a trifle white-fatigue. So smart, I think to keep the needlepoint. I immediately thought of lumbar or other pillows, or even a small ottoman but framing would look terrific, too.
ReplyDeleteI have some chair to recover so I'll bookmark this. But I just keep putting it off.
Happy holidays, Jane
Beautiful! I'm blog hopping and found your blog. I'm now a follower!! Would love for you to check out my blog and follow back!
ReplyDeleteI couldn't have picked a better patterned fabric! We love toile! Great job on the redo! And thanks for stopping by my Do You Toile? Party!
ReplyDeleteKathleen
Your chair redo is beautiful...the fabric choice is just perfect on your vintage chair :)
ReplyDeletePretty! I like the fabric you chose.
ReplyDeleteNancy