Saturday, November 19, 2011

Apricot Stuffed Pork Loin

With Thanksgiving coming up, it's hard not to be thinking about stuffing.  WD loves stuffing.  Back when we were gluten eaters, I used to make it all the time.  The cost of GF bread(or gf flours if you make your own,) makes stuffing more of an occasional thing now, and the stuffing becomes the star of the meal.  Here is one of WD's favorite meals.  Apricot Stuffed Pork Loin.

I start by cubing up the bread.  I use about 5 slices of Udi's whole grain bread.  If you haven't yet tried Udi's, you're missing out.  They make the best commercially available GF bread bar none.  This goes into the oven to toast up.

While the bread is toasting, I dice half an onion and heat it in a small saucepan with a tbsp of olive oil until the onion softens.

I add 1/4 tsp of minced thyme, salt, pepper, 1/4 cup white wine, and 1/3 cup chicken broth and bring it up to a simmer.  I add 1 cup of chopped dried apricots,

and the toasted bread after turning off the heat.  Mix to moisten all the bread.

I trim my pork loin of most of the big hunks of fat, leaving some, because fat is flavor.

I butterfly my pork loin, by slicing through the middle.  This would be done easier with the tip of a chef's knife, but my santoku was already dirty from the onions and apricots and I'm a lazy dishwasher.

Spread the stuffing on the butterflied pork,

and roll it up.

I glazed it with some apricot jam.  I used an organic jam, but maybe next year I'll visit my parents when their apricot trees are ready for harvesting and make my own.
The pork goes in the oven at 375 for about 40-45 minutes.  The boys just love pork made this way.

Thanks for popping in and cooking with me.  I'm linking this up to Gluten-Free Homemaker's Gluten-Free Wednesdays.
Link Party

Thursday, November 17, 2011

Before Blogging Throwback Thursdays #8 - Have a Seat

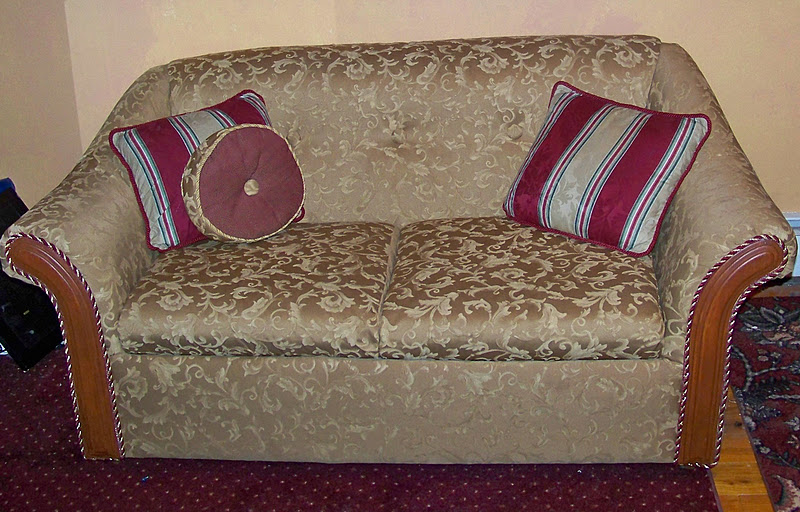
It's Party Time again!  Can you believe it's been a month already?  Seems so much shorter for me since I flaked out on blogging that whole week before Halloween.  This month I'm sharing the loveseat in my bedroom.  This was my very first reupholstery project ever, and I'm really proud of it.  One of the reasons, I've been dithering about redoing my bedroom is that I don't really want to cover up my first ever big project.

When you're young and first starting out, relatives tend to offer you their castoffs, and you oh so gladly take them.  Who am I kidding?  I still gladly take castoffs. ;-)  I searched and searched for pictures of this loveseat pre-makeover, but couldn't find one.  My in-laws might have one(it was theirs, first in the living room, then the basement rec room, then our first apartment.)  I can show you the textured 80s tan, pink & blue fabric that it was covered in.

The back was a couple of large cushions on top of more cushions - like an overweight man at the beach, or something like this sofa.  I smoothed it all out and added the buttons.

The wood was an 80s honey oak.  I used some gel stain right over top without any sanding to make a richer cherry color.

I think that when I redo my bedroom, I'll be making a slipcover for this loveseat, because I'd hate to rip off my first upholstery project.  I'm linking this up to Primitive & Proper's Piece of Work Wednesday, Chic on a Shoestring's Flaunt it Friday, and Remodelaholic's Remodelaholics Anonymous.

That's my look back.  Now let's see what you have to show off this month.  Remember this is a party for anything you made, did, or bought Before Blogging.  Grab a button and get linking.


Sugar and Spice in the land of Balls and Sticks Before Blogging Throwback Thursdays


Wednesday, November 16, 2011

Giving Thanks

There have been some gorgeous Thanksgiving tablescapes out in blogland lately.  I'm keeping mine fairly simple since we'll be traveling up to Rochester where my MIL will be hosting Thanksgiving this year.  I put an assortment of dried foliage in a large glass vase that I love for it's autumn colors, a floral pick under a cloche, and this large wooden pear that I found clearanced for $2.97 at JoAnns.

I love the size of the pear.  The back(or the front if it was used properly) has a little hole in it, because the pear was meant to be a birdhouse.

I thought that this year it'd be nice to have the family write what they're thankful for and stuff those little notes into the pear.  We can bring the pear up to Rochester and read what we're all thankful for on Thanksgiving day.

I printed up a sheet using my favorite font, Bradley Hand,

and cut the sheet into strips.  I'm sure the strips will have the usual suspects like family and home, as well as things like the XBox, but this year one of the things I'm thankful for is all of you who share in my projects both the successes and failures.

This week I'm also thankful for having my Mullet Wingback Chair featured at both Primitive & Proper and the T-Shirt Diaries.  Cassie at Primitive & Proper writes an incredible decor blog with tons of inspiring pictures and projects.  Robin at the T-Shirt Diaries writes a blog with a mix of topics like my own with a firm bent towards re-use and upcycling.

I'm also thankful for having won a Cutting Edge Stencil from Lisa at Vintage Vine.  She has another amazing decor blog that I've been following for a long time.  I can't wait to put my stencil to good use.  Cutting Edge Stencils have the most gorgeous geometric and floral allover stencils as well as murals and other products.  This is the one I've picked out.

Thanks for popping in and giving thanks with me.  Don't forget to come back tomorrow for my monthly Before Blogging party.  Learn more about it here.

http://www.thethriftyhome.comPhotobucket

Tuesday, November 15, 2011

Pumpkin Biscotti

I like to start my day with a cup of coffee and nothing goes better with coffee than biscotti.  In the autumn, Pumpkin Biscotti just feel like the right go to cookie.

I start with 1 cup rice flour, 3/4 cup almond meal, 3/4 cup potato starch, 1 cup sugar, 1 1/2 tsps baking powder, 1 tsp cinnamon, 1/2 tsp nutmeg, 1/2 tsp salt, and a pinch of ground ginger and cloves in a large mixing bowl.  I whisk those together and set them aside.

In a separate bowl, I mix together 2 eggs, 1/2 cup pumpkin puree, 1 tsp vanilla.

I combine the wet ingredients with the dry ingredients,

and shape the dough into two logs approximately 3"x10" each.

Bake the logs for 22 minutes at 350.  The logs will have expanded quite a bit.

Cool before slicing into 3/4" pieces. 

Turn each slice onto a cut side and bake for another 15 minutes.  You can drizzle these with white chocolate or a honey glaze or enjoy them as is.

Thanks for popping in and baking with me.  I'm linking this up to Gluten-Free Homemaker's Gluten-Free Wednesdays, Bake with Bizzy, and Kelly the Kitchen Kop's Real Food Wednesdays.

Sunday, November 13, 2011

Old Door, New Look

One of the very first changes we made to our home when we first moved in was putting in a new door.  The previous owners had a flimsy hollow core door there, and I could practically see the heating dollars flying out the door.  The door we installed was painted white, and remained that way for the past 10 years.

This is the only picture I could find of our door.  I was showing off my Moss Monogram wreath.

I know that the number of days warm enough to leave the door open are quickly dwindling, so painting would have to either happen now or not til Spring.  On a whim the other day, I decided to use some paint I found in our garage to give it a quick makeover.

If you've ever wondered how to paint a paneled door.  It's trim first, then panels, then vertical middle sections, horizontal sections, and finally vertical sides.

Here it is in place.  I tried to snag a pic of it from outside,  but I got a horrible glare off the glass storm door.

That's it.  Easy 1 day project.

Thanks for popping in and painting with me.  Don't forget to come back Thursday for my monthly Before Blogging party.  Read more about it here.
The DIY Show Off