Tuesday, August 23, 2011

Raspberry Cupcakes

I love chocolate, so I make chocolate peanut butter cookies, brownies, and chocolate cake all the time.  The problem?  Computer Genius much prefers a white cake.  White cake is a bit harder for a gluten-free baker, because you can't use garbanzo bean flour, since there's no cocoa to mask the bean flavor.  Still, it can be done.  I made some Raspberry Cupcakes the other day using my basic white cake recipe.

I started by creaming 1 1/2 sticks of butter in my stand mixer with 1 cup sugar.  The trick to getting a light and fluffy cake is in the beating.  You want to let your mixer run continuously for 12-15 minutes total.  The butter should get a minute or 2 on it's own, then another couple of minutes after the sugar is added.

Add 5 eggs and 1 egg yolk one at a time.  Each egg should be completely incorporated and beaten for a minute or 2, before adding the next.  It may look a bit curdled when you add your egg, but it will come together smooth after beating.

Add 1 1/2 tsp vanilla extract,  and 1/2 tsp almond extract.  In a separate bowl, whisk together 1/2 cup brown rice flour, 1/2 cup white rice flour, 1/3 cup potato starch, 2 tbsps baking powder, 1/2 tsp baking soda, and 1/4 tsp salt.

If at all possible use white rice flour from an asian grocery.  It's milled so much finer, and creates much nicer desserts.
Rice flour from an asian grocery on the left, from a regular grocery on the right.

Alternate the flour mix with 1 cup of sour cream in your mixer with the mixer turned down to low.  You don't want to lose any of the loft you've created through the long beat times.

This white cake recipe makes enough for a 2 layer cake, or 24 cupcakes.  I filled my cupcake liners, and added a tsp of raspberry preserves to the top.

The cake will bake up and over the preserves.  It takes about 16-17 minutes for the cupcakes to bake, or about 18-20 minutes for cake layers.

I made my raspberry frosting by adding 1 cup of raspberry preserves to a typical buttercream frosting(butter, powdered sugar, milk, and vanilla extract.)  I piped a swirl onto each cupcake and topped with a fresh raspberry.

Thanks for popping in and baking with me.  Don't forget to come back on Thursday for my monthly Before Blogging Throwback Thursdays party. Learn more about it here.  I'm linking these up to HomeStories of A to Z's Tips & Tutorials Tuesday, Bake with Bizzy,  and Gluten-Free Homemaker's Gluten-Free Wednesdays.

PhotobucketCast Party Wednesday

Sunday, August 21, 2011

Magnetic Board

Every now and again I'll come across something that I know I don't want, but buy anyway because it's super cheap, and I know that I can modify it easily.  This happens with both clothes & decor items.  I was at HomeGoods and found this canvas clearanced for $2.90.

I'm not really a beet-as-art kindof person, but I knew that I wouldn't be able to buy a canvas at the craft store for so little, so I bought it, thinking that I would just paint over it.  I was really excited when I pulled off the plastic at home and found that it had a galvanized back.  I tested a few magnets, and sure enough they held.  Right away, I knew that this would be a nice message board for SB's room.

I still had some leftover wall color paint from when I had decorated his "big boy room" here.  So I painted the entire canvas the bright green, and brushed on some of the orange.

I then sketched out a skateboard silhouette outline,

and filled it in with some blue paint.

I used a silver sharpie to write adjectives describing my Snuggle Bunny, leaving the skateboard for his name.

Here it is hung in his room(with his name redacted in photoshop.)  It sits above his nightstand that I found on Craigslist, and refurbished here.  I threw a couple of magnets on there, but I'm going to have to work on making some more attractive magnets.

Thanks for popping in and painting with me.  Don't forget to come back on Thursday for my monthly Before Blogging Throwback Thursdays party.  Learn more about it here.
The DIY Show Off Keeping It Simple
http://www.thethriftyhome.com

Thursday, August 18, 2011

Picnic in the Story Garden

Back when SB was in preschool, one of my favorite things to do on a nice day was pick him up from his classroom and picnic in the Story Garden.  He went to school at our local children's museum, The Discovery Center.  Right outside of the museum, between it and the Binghamton Zoo, is the Story Garden.

It's a magical place where you can step right into a book, like this scene from Alice in Wonderland,

 or pull out a watering can and help to nourish Peter Rabbit's Garden, where all the food grown is donated to a local food bank,

or peek behind this gate from The Secret Garden.

The Story Garden is free, and a terrific place to explore, so we packed up a picnic in my curbside find picnic basket, and spent several hours there.  We had fresh picked cherries, and I had a banh mi sandwich while SB had dinosaur cutout sandwiches.  The dishes were clearanced melamine dishes from Wegmans.  I prefer washable melamine over paper plates.

We chose to picnic in the Magic Tree House.

There are many child sized houses to explore like the Bear House.

Here's the inside of the Bear House.  Isn't it adorable?

The Earth House is a new installation.  I love it's live roof.  Inside there's a vermicompost bin in one corner.

The Cottage is covered in flowers inside and out.  It even has floral window boxes on the insides of the windows.

SB needed to take a rest in the loft of the Cottage.

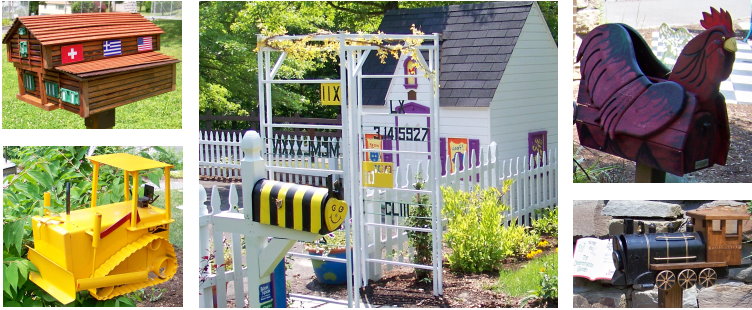
There are whimsical mailboxes all over the Story Garden, and inside each mailbox are laminated storybooks.  At the Determination Garden, there are books like the Little Engine That Could, while at Peter Rabbit's Garden there are, of course, Beatrix Potter books.
Throughout the Story Garden you can search for letters that give you clues to what you're looking at like C for Caterpiller(or climbing wall,)

 D for Dragon, F for Footbridge, or N for Nest.

While the kids are exploring,


it's nice to take in the beautiful gardens,

and sculptures,


or rest in the many available shady spaces.


The Story Garden was completely constructed with donations and volunteer hours.  2 years ago vandals on a drunken binge(they had lined up their beer cans on one of the walls) destroyed large chunks of the garden, uprooting plants, turning over one of the smaller houses, and breaking many sculptures.  A local grocery chain donated surveillance cameras, university students by the hundreds volunteered, and the Junior League which does much of the daily maintenance on the garden all pitched in to clean it up and create an even better Story Garden.  I think bringing the magical world of books to kids is one of the best ways to donate your time or money.  I don't always have money to give, but I do have time, and causes like this are the ones that move me.

Thanks for popping in and picnicking in the Story Garden with me and SB.  I'm linking this up to Decor to Adore's Wayfaring Wednesdays.